- Home
- Hat Knitting Tips & Hat Size Chart
Hat Knitting Tips For Beginners
Hat knitting is such a fun and rewarding quick knitting project.
It's a small enough project to stuff in your bag and take with you and they're just fun to knit.
They're also a great gift knitting idea and also make great stash busters.
Most knit hats take less than one skein of yarn so pull out your half balls of yarns and knit a hat.
While you're at it make an extra one and donate it to your favorite charity.
As you learn how to knit hats you may decide that you'd like to design your own.
I also created a downloadable hat size chart for a quick reference to help you.
Plus I have some hat knitting tips to help you along the way.
I love to knit hats and thought you might too once you learn a few hat knitting basics.
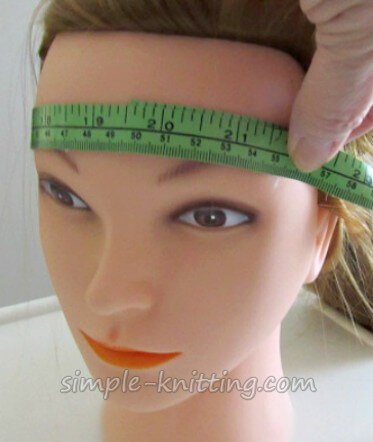
I'll show you how to measure your head for the perfectly fitted hat.

Plus I'll explain how to make those knitting decreases at the crown of the hat
But first, here's a question I'm asked all the time:
Can I knit a hat with straight knitting needles?
Absolutely yes! You can knit hats flat. In fact it's still my favorite way to knit them.
I knit hats both ways but my first choice is knitting flat just because I enjoy knitting them that way.
The only difference is you'll need to seam the hat up the back. And it's very simple to do.
How To Measure Your Head Circumference
To measure your head circumference you measure around your forehead and just above the ears.

Go around the widest part of your head and keep the tape comfortably snug.
Important Hat Knitting Tip
You're finished hat should be 2 - 4 inches smaller than you're actual head circumference.
I usually knit mine 2 inches smaller. Why?
Because you want your hat to fit comfortably snug on your head.
Knits do stretch and if you knit a hat the same size as your head it'll end up slipping down.
It just won't fit comfortably. You want a hat to be comfortably snug but not too tight.
And keep in mind, if you use a stretchy yarn or stitch pattern like ribbing you'll need to take that into account.
What that means is you may need less stitches so that your hat won't be too loose.
Note: Ribbing is a great choice for knitting hats when you don't know the persons size.
The main reason for that is ribbing stitches are stretchy.
How Long Should A Knitted Hat Be Before Decreasing?
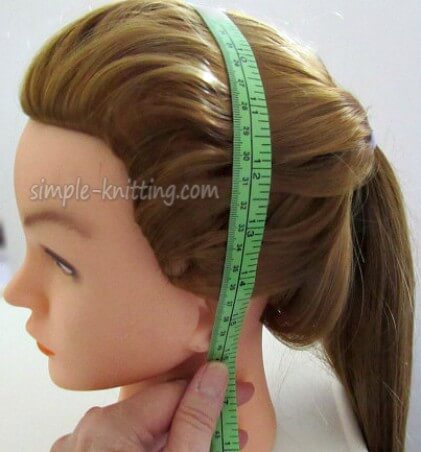
How to Measure Your Head For Hat Length
The hat length is also an important measurement so that you knit your hat to the proper length.

Take your tape measure and put it at the base of your ear, go up over your head and down to your other ear at the base.
Find that measurement and divide by 2. That's the length you'll need.
Most average adult hat lengths will be around 16 inches so divide by 2 = 8 inches in length.
Or large adult hat lengths will be around 18 inches so divide by 2 = 9 inches in length.
So basically you'll knit anywhere between 8 and 11 inches in length.
When you knit it longer it's usually because you want to roll up the brim or maybe your knitting a slouchy hat.
And now that you have your measurements you're ready to knit a hat or two.
How Many Stitches Do You Cast On To Knit A Hat?
It all depends on the yarn you have and how thick it is.
If you're using say a sock yarn you'll need a lot more stitches than if you're using a worsted weight or bulky yarn.
Here's what I do. My head is 22 inches so I always plan to knit my hats at 20 inches.
Sometimes I'll go up to 21 inches if I'm using a tighter stitch pattern, one with cables for instance.
Next thing is to check the yarn label for suggested needle size and gauge.
I do a quickie gauge swatch to find out how many stitches per inch I get.
If you don't do gauge swatches then be sure to check the gauge on the yarn label. It's important.
So if I get 4 stitches per inch I multiply 4 X 20 = 80 sts to cast on
If I get 3 stitches per inch I'll multiply 3 X 20 = 60 stitches to cast on and so on.
And if the yarn is thin and I get 7 stitches per inch I multiply 7 X 20 = 140 stitches to cast on
That's a big difference and that's why it's hard to tell how many stitches to cast on for a hat.
It's easy enough to figure out though, super easy, eventually you'll know just by looking at the yarn.
How to Decrease Knitting at Crown of Hat
There are many ways to figure out how to work the decreases at the crown of a hat.
Some are very intricate for special design knit hats.
The way I show you will be for a simple basic knit hat. Once you do it a few times it'll get easier.
The most important thing to keep in mind with crown decreases are to keep them evenly spaced around the top.
The most common decrease method for working the top of the hat is by dividing the stitches into eight groups of stitches.
So if I have 80 stitches on my needle. Figure out some numbers that can be divided by 80.
Here's a few; 2, 4, 5, 8, 10, 16, 20. And you can basically choose any of these numbers.
And I'm going to choose 10 but again you can choose any of those numbers.
It might be helpful for you to use stitch markers so you can mark off each section.
By choosing 10 I'm creating 8 groups of stitches on the top of the hat with 10 stitches in each section.
And I'm going to knit decreases in each group with the K2tog decrease.
The k2tog involves 2 stitches so you'll work out the formula like this:
10 sts - 2 sts for the k2tog = 8 so you're first row will look like this:
*Knit 8, k2tog, repeat from * around or across the row.
Usually there is a knit or purl row after the decrease row.

The rest of the decreases are easy. You'll use one stitch less on the following rows.
So the next decrease row will look like this:
*Knit 7, k2tog, repeat from * to end of row.
When you've decreased to about 40 stitches stop knitting the plain row in between the decrease rows.
Now you can decrease on every row until you finish with K2tog right around.
Quicker Decreases For The Hat Crown
Depending on the hat style you're knitting you may want to decrease faster rather than gradually.
That's totally fine too and you can choose a smaller number like 4 or 5. Let's say 4.
4 goes into 80, 20 times so the formula will be like above, 4 - 2 for the k2tog = 2.
And you'll decrease 20 stitches in the first decrease row, here's how it'll work:
*Knit 2, k2tog, repeat from * to end of row
Put in a plain knit row because there's such a sudden drop in stitches.
Then move down to:
*Knit 1, k2tog, then
Maybe another plain row depending on your preference and then...
K2tog and you're done.
I used this quicker way to decrease for my knit hat pattern and it worked out nicely.
It's all basic math and pretty easy to figure out most times.
So what happens if you're working with a stitch pattern?
Well, you're going to have to plan out your decreases more carefully if you want to stay in pattern.
Unfortunately there is no magic formula for that.
What you need to do is find places in the stitch pattern where you'll be able to make the decreases and at the same time, stay in pattern.
I struggle with this myself. It can be done though, you'll just need to think about it a little.
You can download the hat size chart here
Hat Size Chart For Hat Knitting
Size
Preemie - 1 to 2 lbs
Preemie - up to 4 lbs
Preemie - up to 6 lbs
Newborn
Baby up to 6 months
Baby up to 12 months
Toddler up to 3 years
Child up to 10 years
Teen
Adult Woman
Adult Man
Head Circumference
9 inches
11
12 - 13
14
17
18
19
19 - 20
21 - 21.5
21.5 – 22.5
22.5 – 24
Hat Length
3.5
4
4.5 - 5
6
7
7.5
8
8.5
10
11
11
The hat lengths include extra length for turning up the brim of your hat. It's usually between 1 and 2 inches.
Hope this helps. Happy Hat Knitting!


Comments