- Home
- Knitting Stitch Patterns
- Rib Stitch
Rib Stitch Patterns - How To Knit Ribbing
Every knitter needs to learn how to knit basic rib stitch patterns because you'll be using them a lot and they're handy.
And knowing these basic ribbing stitch patterns will help you when you start making all those cozy knit sweaters, hats and socks.
Ribbing is one of the best ways to create a super stretchy form fitting piece of fabric.
Rib stitches have many uses for example...
- necklines, cuffs and borders on sweaters
- waistlines
- cuffs on mittens, hats and socks
- scarves
- hems
- an allover stitch pattern
The list is endless. Whenever you want your knitting to snug up a little you can add some ribbing to it to get the effect you want.
For instance if you want a form-fitting top you can add some ribbing stitches to the waistline.
First Basic Rib Stitch Pattern
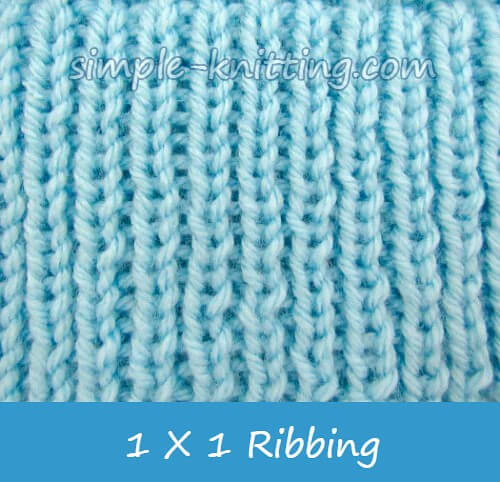
This is called the 1 X 1 rib stitch and what that means is that you'll knit 1 stitch and purl 1 stitch all the way across your needle.
This ribbing is stretchy, reversible and looks lovely on garments.
You can knit 1 X 1 ribbing with either an odd number of stitches or an even number.
For an odd number of stitches work the ribbing as follows:
Row 1: With yarn in back knit 1, bring yarn to front and purl 1, repeat the knit 1, purl 1 across row
Row 2: With yarn in front purl 1, bring yarn to back and knit 1 repeat purl 1, knit 1 across row.
Repeat row 1 and 2
If you have an even number of stitches work every row as follows
Row 1: With yarn in back knit 1, bring yarn to front and purl 1, repeat knit 1 and purl 1 across row
Then simply repeat row 1 until you have the length you need.
Second basic Rib Stitch Pattern
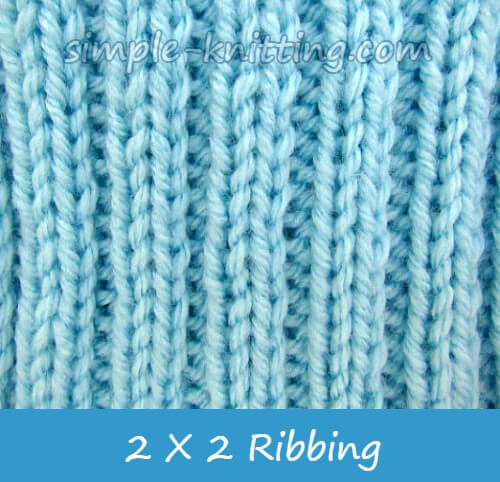
This is 2 X 2 ribbing and that means you knit 2 stitches and purl 2 stitches all the way across your needle.
I find this ribbing to be a little more stretchy than the 1 X 1 ribbing and tend to use this one a little more because of the stretchiness. This is also reversible.
2 X 2 Rib Stitch Pattern
If you want to try knitting the 2 X 2 rib you'll need to cast on in multiples of 4 stitches so that means you'll need to cast on 4, 8, 12, 16 or 20 sts.
Then you'll knit the rib stitch pattern as follows:
Row 1: With yarn in back knit 2, bring yarn to front and purl 2, repeat knit 2 and purl 2 across the row
Row 2: Repeat row 1
Other Rib Stitch Patterns
There are hundreds of knitting ribbing variations for that you can try too. You just have to play a little and see which ones you like.
- Knit 3, purl 3 - multiple of 6 stitches, so cast on 6, 12, 18, 24 sts
- Knit 4, purl 2 - this also is multiple of 6 stitches as above
- Knit 4, purl 4 - multiple of 8 stitches, so cast on 8, 16, 24, 32
Ribbing is so versatile and you can be as creative as you like. If you want a ribbing stitch pattern that's really stretchy you may enjoy the 2 X 2 ribbing and even a 3 X 3 rib is nice and stretchy too.
My turtleback sweater is made with 3 X 3 ribbing and it's super stretchy. And by the way it's completely beginner friendly. :)
Or if you're looking for a decorative rib stitch pattern you'll love the broken rib stitch pattern I have on my stitch patterns page.
Actually I have a few rib stitch patterns you can try and they're all lovely.
How to Knit Rib Stitch Instructions
When you knit ribbing you knit the knit stitches and purl the purl stitches stacking them onto each other row by row.
Have you ever seen a pattern that said to knit the knits and purl the purls? Or, work each stitch as it presents?
Well I'm going to help you--read on
How to identify knit stitches and purl stitches
When you can identify the knits from the purls you'll have a much easier time with ribbing and with any pattern that tells you to work each stitch as it presents. Take a look below..
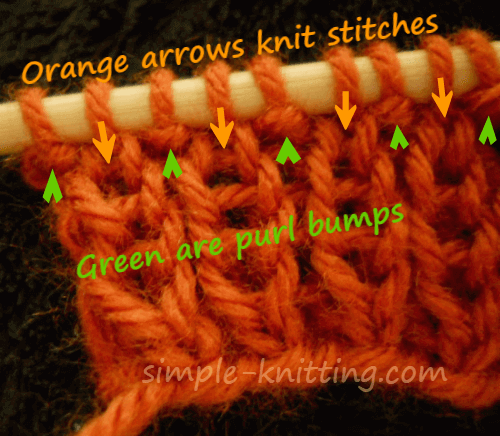
The knit stitch looks like little V's and the purl stitches look like bumps.
In the photo I've just begun ribbing so the little V's aren't well defined yet but you can still see the little columns of knit stitches forming with the purl stitches alongside each column.
Let's get started knitting rib stitches
For practice purposes and to make it easier for you, cast on an even number of stitches.
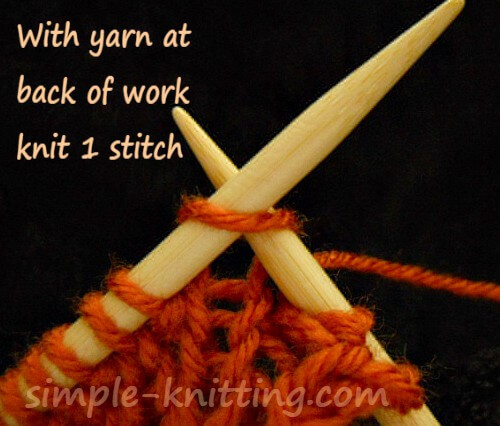
Make sure your yarn is at the back of your work and knit the first stitch.
Note: See how I am knitting the little V or smooth stitch?
Then bring your yarn to the front of your work and purl the next stitch.
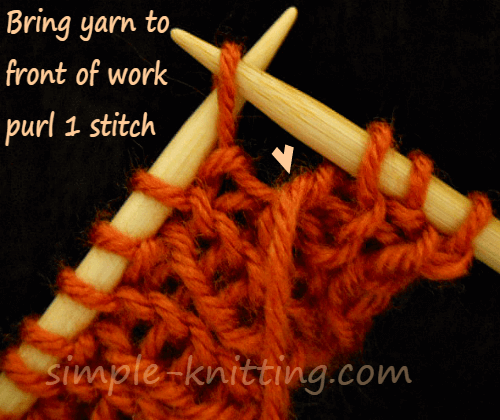
Note: See how the yarn is in front and I am purling into the bump?
Keep ribbing stitches across your row and remember:
1. Yarn at back to knit next stitch
2. Yarn in front to purl next stitch all the way across the stitches on your needle.
When you finish your row, turn your work and start again with knit 1, purl 1.
And that's how to knit rib stitches.
Important Knitting Tips for Rib Stitches
1. Remember that with the 1 X 1 rib stitch you can use either an odd number of stitches or an even number.
And I'd like to explain a little further about using an odd number of stitches.
When you use an odd number of stitches you'll end the row with a knit stitch.
The knit stitch on the right side of your work will look like a 'V' but on the reverse side it looks like a purl stitch or purl bump.
So that means when you turn your work to start ribbing again you'll need to start by purling the purl bump.
The purl stitch on the right side of your work is a purl bump but on the reverse side it is a "V'.
So if you end with a purl stitch and turn your work you'll start by knitting the first stitch.
It's might be difficult to grasp at first. So please look at your knitting and it'll become clear.
Check it out on your knitting right now. So say you're looking at a purl bump, turn your knitting around and you'll see on the other side that it's a little v.
This is what's known as knitting the knits and purling the purls or knit the v's and purl the purl bumps.
That's why it's so helpful to be able to identify the knits and the purls on your needle.
2. Always remember to move your yarn back for knitting and forward for purling. It takes practice but you'll get it.
3. The wider the ribbing is, the softer elasticity it will have. What I mean is it'll still be stretchy but it will be a little looser and not as snug.
4. Many patterns especially for sweaters will ask you to knit the ribbing stitches on smaller needles. Why? Because it makes the fabric more snug.
So for instance ribbing along the sleeve cuffs and the border of your sweater will probably be done on smaller needles, usually one or two sizes smaller.
I usually go down one size in needles unless I want something super snug and then I'll go down two.
5. If you are working a ribbing stitch pattern always try it out first on a test swatch to see if it will be stretchy enough for what you want.
Some rib stitches are more elastic than others.
I hope this helps.
Happy Knitting!

Comments